

The ukulele is one of the friendliest instruments in the world to start with. It has just four soft nylon strings, it sits easily in your hands, and you can learn your first chord in about a minute and play a simple song within a day or two. You do not need any musical background, and you do not need to read sheet music to get started.
This guide walks you through everything a complete beginner needs: the parts of the instrument, how to hold it, how to tune it, how to read chord charts, your first five chords, how to strum, and how to put it all together into your first song. Work through it in order and you will be playing music by the end.
If you have not chosen an instrument yet, it helps to know the four main sizes first. Our guide to the different types of ukuleles explains the differences, but the short version is below.
Get to Know the Parts of the Ukulele
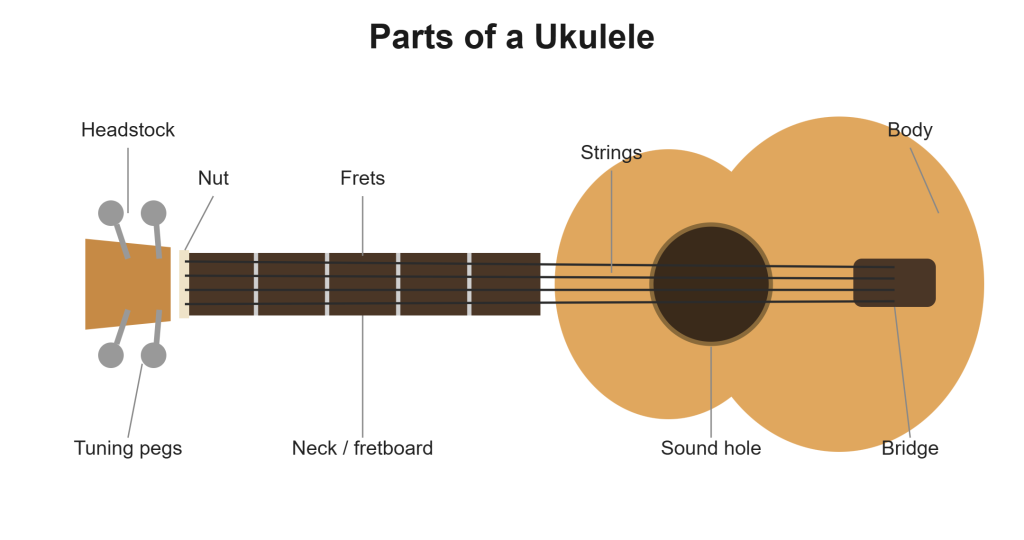
Before you play, it helps to know what everything is called. You do not need to memorize this, but you’ll see these words again and again as you learn.
- Headstock — the top of the instrument, where the tuning pegs are.
- Tuners (tuning pegs) — the knobs you turn to raise or lower the pitch of each string.
- Nut — the small grooved strip where the headstock meets the neck; it guides the strings.
- Neck and fretboard — the long part you press the strings against.
- Frets — the metal strips across the fretboard. The space between them is also called a fret, and that is where you place your fingers.
- Body and soundhole — the hollow part that makes the sound louder.
- Bridge and saddle — where the strings attach to the body.
- Strings — four of them, named G, C, E, and A from top to bottom.
Which Ukulele Should a Beginner Start With?
Most beginners are happiest starting on a soprano (the classic small size, about 21 inches) or a concert (a bit larger at about 23 inches, with more room for your fingers). Both use the same standard tuning and the same chords, so anything you learn on one carries over to the other.
If you have larger hands, a concert or tenor may feel more comfortable, since the frets sit a little wider apart. Whatever you choose, avoid the cheapest toy instruments, because they are hard to keep in tune and that makes learning frustrating. A modest beginner instrument that holds its tuning is worth it.
How to Hold the Ukulele
Good posture makes everything easier. If you are sitting, rest the body of the ukulele against your chest and keep it there with your strumming forearm, using just enough pressure to hold it steady. Your strumming hand should stay free to move over the strings without having to hold the instrument up.
Your other hand cradles the neck. Let it rest between your thumb and index finger, with your thumb on the back of the neck. Do not grip hard, because a tight grip tires your hand and slows your chord changes. Angle the neck a little upward, not straight down at the floor.
If you are standing, the same idea applies: the forearm of your strumming hand holds the body against your chest. Many players use a strap later on, but you do not need one to begin.
How to Tune Your Ukulele
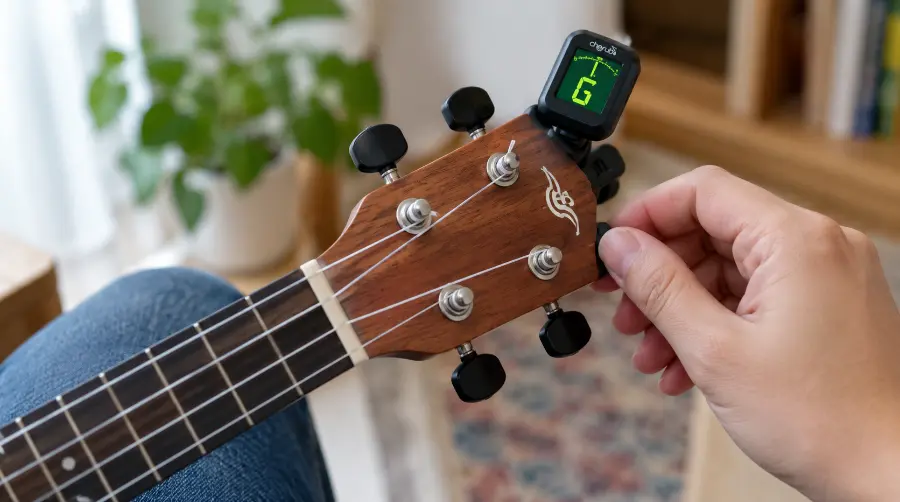
An out-of-tune ukulele sounds wrong no matter how well you play, so this step matters. The standard tuning for soprano, concert, and tenor ukuleles is G-C-E-A, reading from the top string (closest to your face) to the bottom string (closest to the floor).
One thing surprises new players: the top G string sits higher in pitch than the C and E strings next to it, not lower. This is called re-entrant tuning, and it gives the ukulele its bright, cheerful sound. A classic way to remember the four notes is the sung phrase “My dog has fleas,” where each word matches one string: G-C-E-A.
The easiest way to tune is with a clip-on tuner that attaches to the headstock, or a free tuner app on your phone. Pluck one string at a time, watch the tuner, and turn that string’s peg by small amounts until the display shows the correct note. When all four strings read G, C, E, and A, you are in tune. Check your tuning every time you pick up the instrument, since new strings drift out of tune for the first week or two.
How to Read a Ukulele Chord Chart
A chord chart (also called a chord diagram) is a simple picture of the fretboard. Once you can read one, you can learn any chord on your own.
- The four vertical lines are the strings. From left to right they are G, C, E, A.
- The horizontal lines are the frets. The top line is the nut, the next space down is the 1st fret, then the 2nd fret, and so on.
- A dot shows where to press a string down. A number inside or beside the dot tells you which finger to use.
- A 0 above a string means play it open, without pressing anything.
For fingers, players number the fretting hand like this: 1 is the index finger, 2 is the middle finger, 3 is the ring finger, and 4 is the pinky.
Your First Five Ukulele Chords
These five chords are the foundation for hundreds of songs. The table below shows which fret to press on each string. A 0 means you play the string open, and the finger notes show the easiest way to shape each chord.
| Chord | G string | C string | E string | A string | How to finger it |
|---|---|---|---|---|---|
| C | 0 | 0 | 0 | 3 | Ring finger on the A string, 3rd fret |
| A minor | 2 | 0 | 0 | 0 | Middle finger on the G string, 2nd fret |
| C7 | 0 | 0 | 0 | 1 | Index finger on the A string, 1st fret |
| F | 2 | 0 | 1 | 0 | Index on E string 1st fret, middle on G string 2nd fret |
| G | 0 | 2 | 3 | 2 | Index on C string 2nd fret, middle on A string 2nd fret, ring on E string 3rd fret |
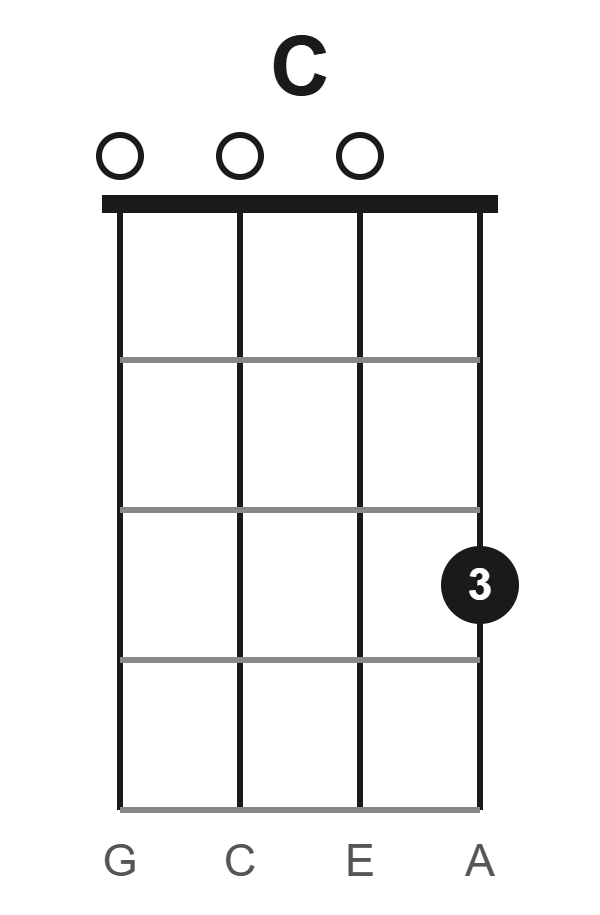
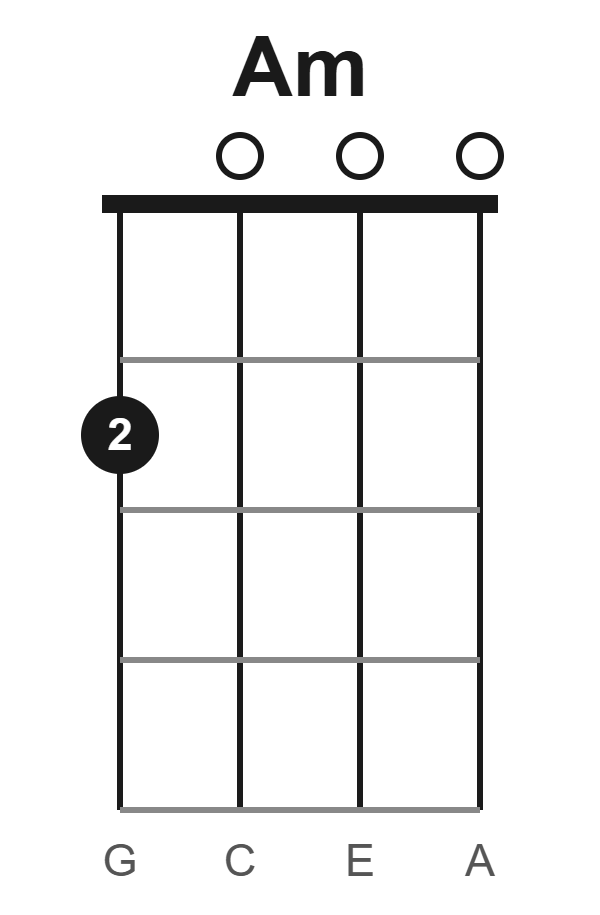
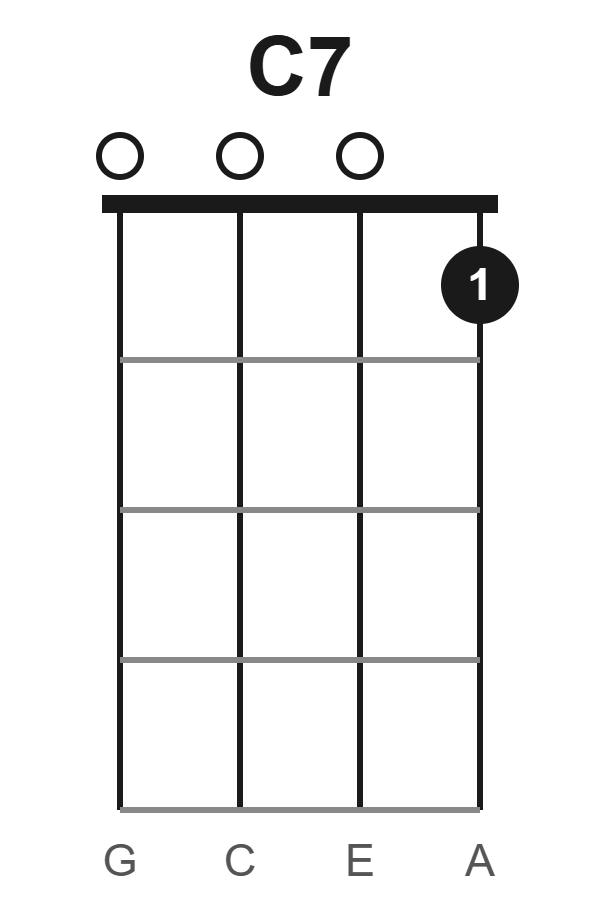
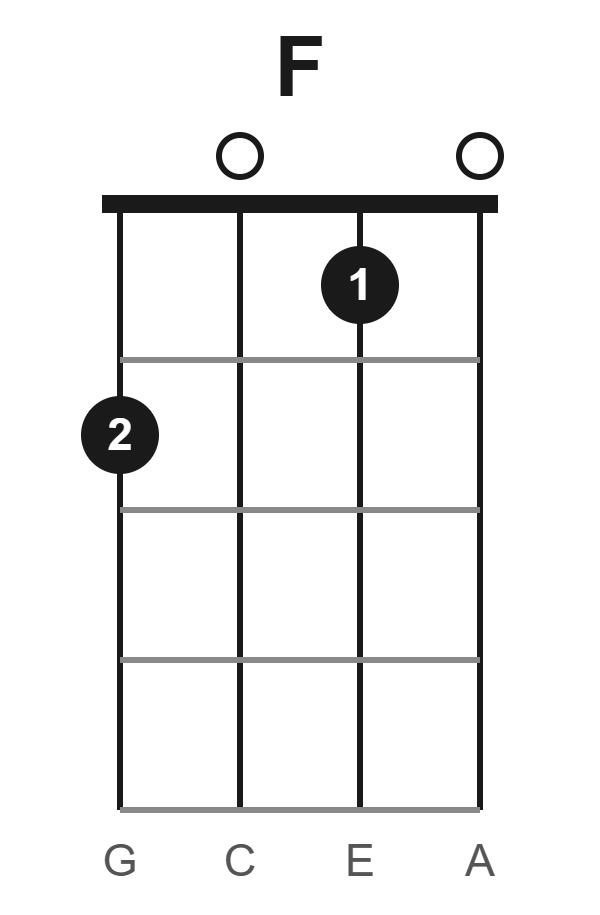
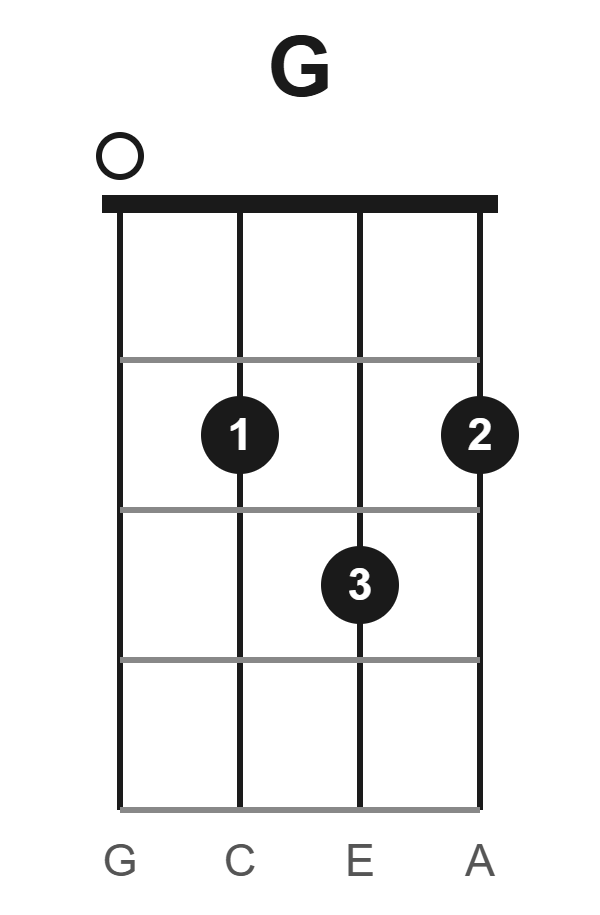
Start with C, because it needs only one finger and sounds great. Then add A minor and C7, which are also one-finger chords. Once those feel comfortable, learn F, and last of all G, the trickiest of the five because it uses three fingers in a small triangle shape. Take your time with G; almost every beginner finds it awkward at first, and then one day it clicks.
Tips for Cleaner-Sounding Chords
Press with the tips of your fingers, not the flat pads, and keep your fingers arched so they do not touch the neighboring strings. Place your fingers just behind the fret, not on top of the metal bar, which gives a clear note with less effort. If a string buzzes or sounds muted, check that you are pressing hard enough and that no other finger leans against it. Strum one string at a time to find the one that is not ringing true.
How to Strum the Ukulele

Strumming turns chords into music. Strum where the neck meets the body, roughly over the top edge of the soundhole, rather than in the middle of the body.
The most common technique uses the nail side of your index finger. Keep your hand relaxed and let it move from the wrist, like a gentle wave, rather than from the whole arm. For a down strum, brush down across all four strings from G to A. For an up strum, brush back up from A to G. Stay loose; most beginners strum too hard and too stiff, which sounds harsh and tires the hand.
Three Strumming Patterns to Practice
- All downs: four steady down strums per chord. This is the simplest and a perfect starting point.
- Down-up: down, up, down, up. Count it as “one-and-two-and.” This gives your playing a nice steady rhythm.
- The island strum: a favorite ukulele pattern that goes down, down-up, up-down-up. It sounds more advanced than it is, and once it becomes automatic it works for a huge number of songs.
Practice each pattern on a single chord first, so your strumming hand can learn the motion without your fretting hand having to change anything.
Playing Your First Song
With just the chords above, you can already play along with a great many songs. One of the most useful sequences to learn is C, A minor, F, G, played in that order and repeated. This four-chord loop shows up in countless pop, folk, and classic songs, which is why practicing it pays off.
Start by strumming each chord four times with slow, steady down strums before moving to the next: four strums of C, four of A minor, four of F, four of G, then back to C. Do not worry about speed. Aim to switch chords cleanly and hold a steady rhythm. Once the changes feel comfortable, try two strums per chord, then bring in a down-up or island pattern. Playing along with a slowed-down version of a song you love is one of the fastest ways to improve.
A Simple Daily Practice Routine
Short, regular practice beats occasional long sessions. Even ten to fifteen focused minutes a day moves you forward fast. A good routine looks like this:
- Tune up first, every single time.
- Warm up with a chord you know well, playing slow, steady strums.
- Practice one difficult chord change on its own. A great exercise is the “one-minute change”: pick two chords and switch back and forth between them for sixty seconds, counting how many clean changes you make, then try to beat that number tomorrow.
- Play through your four-chord song loop.
- Finish by playing something fun, even if it is messy.

Common Beginner Mistakes to Avoid
Almost every new player runs into the same handful of issues. Spot them in advance and you’ll save a lot of frustration.
- Forgetting to tune. Practicing on an out-of-tune instrument trains your ear wrong and sounds discouraging. Tune first, always.
- Gripping too hard. A death grip on the neck slows you down. Stay relaxed.
- Strumming too fast or too hard. Slow, gentle, and steady sounds far better than fast and frantic.
- Giving up on tricky chords. The F and G chords feel impossible for about a week, then click into place. Push through.
- Practicing only occasionally. A little every day beats a lot once a week.
Frequently Asked Questions
Is the ukulele easy to learn?
Yes. Many teachers rank the ukulele among the easiest instruments for beginners. It has only four strings, the nylon strings are gentle on your fingers, and many chords need just one or two fingers. Most people can strum a simple song within their first few days of practice.
How long does it take to learn the ukulele?
You can learn a few chords and play a basic song in a day or two. Clean chord changes take a few weeks of regular practice, and a comfortable, confident level takes a few months. Your progress comes down to how often you practice more than to natural talent.
Which ukulele is best for beginners?
A soprano or concert ukulele is the most popular choice for beginners. The soprano is the classic small size with a bright tone, while the concert runs a bit larger with more finger room. If you have larger hands, you may prefer a concert or tenor. You can compare all four sizes in our guide to the types of ukuleles.
Do I need to read music to play the ukulele?
No. Most ukulele players never read traditional sheet music. Instead they use chord charts and chord names, which are much simpler to learn. Reading standard notation is a useful skill later on, but it is not needed to start playing and enjoying songs.
Are ukulele strings hard on your fingers?
Not very. Ukulele strings use soft nylon or similar materials, so they are far gentler than the steel strings on a guitar. Your fingertips may feel a little tender in the first week, but they toughen up fast and the mild soreness soon fades.
Start Playing Today
Learning the ukulele comes down to a few simple steps: hold it in a comfortable position, keep it in tune, learn a handful of chords, and practice switching between them a little every day. Be patient with the chords that feel awkward at first, keep your hands relaxed, and play songs you love. Before long, strumming will feel like second nature.
Once you are comfortable, it is worth learning a little about where this cheerful instrument came from. Take a look at our full guide to the history of the ukulele to discover how a small Portuguese instrument became a beloved symbol of Hawaiian music and a global favorite.
8 thoughts on “How to Play the Ukulele: A Complete Beginner’s Guide”